Chapter 15
Firewall Accessories
This isn't a very big chapter considering that so much stuff will eventually be bolted to it! After completing the fitting of the cowlings and engine, the flanges are in place around the perimeter of the firewall and all glassing on the aft surface is complete. So, all that is left is to fabricate four rudder pulley brackets and mount the firewall insulation and aluminum liner.
First I had to flox 1/4 inch foam to the exposed aft face of the center section spar to bring it to the same plane as the firewall. Then I placed the insulation against the firewall and used a utility knife to trim it to shape. The insulation is called fiberfax and is about 1/8 inch thick. After cutting the insulation to shape I attached it to the firewall and exposed spar with silicone adhesive.
Next, a paper template of the firewall and exposed spar is made with all the holes for the engine mount, fuel line, vent lines, pulley bracket screws and such located on the paper. I used posterboard and it worked great. I was able to test fit the paper first and make sure everything lined up prior to cutting the aluminum. Once I confirmed everything fit, I layed the template on the aluminum and traced the outline and holes with a felt pen. I then used my tin snips to cut out the line and drilled the holes. I test fit this piece on the firewall and once it was ready I used silicone adhesive once again to attach the aluminum to the firewall/fiberfax. The adhesive was run in a bead all around the perimeter and in crossing patterns on the fiberfax. The aluminum wasn't quite wide enough to cover the exposed spar areas, so I made these in separate pieces and attached them first, overlapping the main piece of aluminum over these.
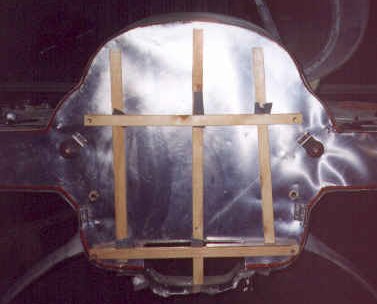
To hold everything in place while it cured, I made a lattice of wood and used the engine mount bolts to pull it snug against the firewall. I also attached the pulley brackets as additional pressure on the liner. I let this sit overnight, came back the following day and peeled off the protective plastic covering the aluminum.
The fuel line from the tank switch valve goes through the firewall, so I attached a firewall fitting to the firewall instead of running the line straight through. This will aid me if I ever need to replace or repair the line. I chose to run the fuel line on the left side of the cockpit so it penetrates the firewall just to the right of the left pulley bracket. I attached the fuel line from the valve to the fitting on the inside of the fuselage using standard flare fittings. The firewall fitting makes a 90 degree turn on the aft face of the firewall and the remainder of the fuel system gets connected along the lower side of the firewall running from the left to the right. My fuel injection system fuel fitting is located on the right side of the engine, so this worked out great!
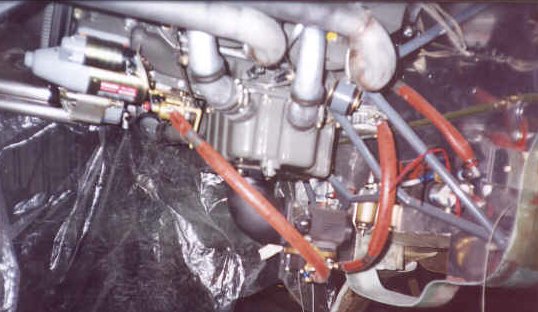
The fuel injection system came with its own fuel filter and electric boost pump so I used those instead of the parts that I ordered over a year ago (before I had finalized which engine to use). The fuel line goes into the gascolator, then to the electric fuel pump. The electric pump feeds to the engine driven fuel pump. From there it goes to the fuel filter that will be mounted on the engine mount using adel clamps then to the fuel injection unit fuel controller. A smaller line goes from the fuel controller to the fuel distribution block mounted under the engine between the starter and alternator. Here is a photo of the underside of the engine with most of the fuel lines run. I used flexible stainless steel braided teflon fuel lines made by Aeroquip and added firesleeving to each hose.
NEW: October, 2000
Well, after doing all that, I ended up re-routing the fuel lines, re-mounting some firewall components and generally making a real mess out of the firewall liner! It began to look pretty bad and, as much as I hated re-doing it, I decided to make a new firewall liner out of polished stainless steel. It not only looks better than the aluminum, but it affords a better fire barrier. I bought a piece of stainless from a surplus store in town and took the old liner off the plane after unbolting all the accessories from it. I used the old liner for a template and cut out the stainless. I marked where all the holes were I needed and drilled those out in the stainless as well. The fiberfrax didn't survive the disassembly, so I replaced it. That required scraping all the old RTV and bits of fiberfrax from the firewall! When it was good and clean, I floxed all the holes closed that I drilled but wasn't using anymore and let it cure. I then applied a new coat of RTV, applied the new fiberfrax, added another new coat of RTV to that and installed the stainless liner. Much better! I reattached all the firewall accessories and was happy I had decided to do it.
This completes Chapter 15! Again!